What Is Ledger Live & How To Install for your Ledger Hardware Wallet
Step-by-Step Guide to Install Ledger Live
If you’re using the Ledger as your go-to hardware wallet for your cryptocurrencies. They recently launched the Ledger Live Software Application for your computer to replace the Chrome Apps needed to manage, send and receive your Bitcoins or Altcoins.
Ledger Live is a brand new way to manage all your crypto assets under one roof.
Before Ledger Live was introduced, users had to install an app extension from the Chrome Web Store via their Google chrome browser. And each asset had a separate extension that needs to be accessed only one at a time.

Not that the Chrome Apps were insecure or anything like that, even if it did the Ledger Hardware wallet can operate safely even if your computer is compromised.
Your private keys on your Ledger Device is never exposed. That’s the beauty of buying a hardware wallet like the Ledger.
The only problem with chrome applications for the Ledger is that it doesn’t display all your coins under one application. You have to install a different Chrome App for each crypto.
And as you may know, Google is phasing out all the Chrome Applications, rendering all hardware wallet chrome extensions obsolete, including the Trezor Chrome Extension.
The Ledger Live is a breath of fresh air. Now that the Ledger Nano S is no longer the cheapest Hardware wallet in the market, at least with its own desktop user interface, it can boost compatibility and provide on-boarding users a better user experience.
What it Means for Me?
Updates are highly recommended by the Ledger support team. To install please visit Ledger.com
If you are still using the Ledger Chrome Extension, you do not need to make the change now, but as Ledger makes the transition to its own interface, you will need to face the possibility of missing important updates they make.
New users are now being directed to the Ledger Live application to view, manage, send and receive their coins. It is as simple as adding an account and listing each cryptocurrency under one portfolio.
If you have yet to buy a Ledger just head over to Ledger’s official website to order one before you check out this Step-by-Step Guide to installing the Ledger Live.
Before you start, make sure:
- You have a Ledger Nano S or Ledger Blue hardware wallet
- Your computer or PC has a minimum requirement:
- Windows 8 (64-bit)
- MacOS 10.9 (64-bit)
- Linux Ubuntu 16.10 (Ledger Live cannot work with 32-bit Operating System)
- Your device has a USB port, you have to use an adapter for USB-C ports
- Stable internet connection
Let’s get started…!
 Download is available for your Windows PC, Mac OS or Linux, just go to Ledger.com and click on the blue “Download Button”
When prompted, just click on “Yes” to proceed and then install in any directory of your choice.
The Ledger Live desktop icon look like this ![]()
Double click on the icon to run the software on your desktop or computer.
A simple welcome message and white interface will appear.

Click on the “Get Started” blue button to proceed.

If your device is new and needs to be initialized from scratch , please refer to this guide: Ledger Nano S: A 6-Step Walkthrough Guide for Non-Experts. (This uses the old Chrome App to initialize, basically the same process now with Ledger Live.)
Now, let’s continue with a device that has already been initialized.

Next you have the option to select one of two different Ledger Hardware wallets.
The first is the Ledger Nano S, Second is the tablet-styled Ledger Blue.
Step 1: Selecting either one will still bring you through similar steps.

In this case, I selected the Ledger Nano S. The more popular version of the Ledger Wallet.
Don’t worry!
FIX: You need to first update your Ledger Hardware wallet to the latest firmware. In my case, I updated from 1.4.1 to 1.4.2
If you have access to your old Chrome extension app, go straight into updating your Ledger Hardware wallet first, before attempting to connect it to your Ledger Live software here.
Click on “Continue” and you will be brought to a screen for a security clearance.

Step 2: Go ahead and complete the security checklist to verify whether you device is genuine or not.
- Answer the questions displayed on-screen by clicking on Yes or No. If you have any doubts or you’ve answered NO to any of the questions listed, please contact Ledger support, they will assist you.

- Click Check now, to begin verifying your device. The icon will start spinning around until you press the right button on your Ledger wallet to allow Ledger Manager access. This process will take a few moments. If your device is a genuine Ledger device, you should see the message below.
- Only a genuine Ledger device can provide the cryptographic proof required to connect with Ledger’s secure server. Note:

3. Go ahead and click on Continue and you will proceed to step 3

Step 3 is an additional password lock phase where you can prohibit anyone who has access to your computer from accessing your Ledger Live application.
With the New Ledger Live Application installed on your computer, you can check your cryptocurrency account balances at any time without needing to connect your Ledger Hardware wallet.
With this convenience though, anyone who has access to your PC can peep into your account or portfolio and see how much crypto-assets you personally own. Hence, the lack of privacy.
You can also choose to Skip this step and proceed without losing any added security benefits.

Step 4: Bugs and Analytics
Aside from the mandatory sharing of your Ledger Live Technical Data, you are given the option to also share your analytics or reporting of bugs within your software.
By doing so you’re participating in Ledger’s quality assurance process. Of course, if you’re a privacy freak, you wouldn’t agree to such requests.
By opting in, the Ledger company will automatically collect your data. Of course you can always decide to opt out at any time from the Settings > General (Scroll Down).
- You can select which following you’d like to share:
- Report bugs: Automatically send reports of bugs within the software.
- Share analytics: Your usage help Ledger improve its user experience.
- Click on Continue.
- Click on Open Ledger Live to open the application.

Interface overview
Ledger Live’s interface consists of four main elements. In the left panel you’ll find the menu and accounts, in the top bar you’ll find buttons for application controls and then there’s the main viewer.

Menu
Use the menu to go to different main sections:
- Portfolio: Summary of your accounts.
- Send: Send crypto assets at any time.
- Receive: Receive crypto assets at any time.
- Manager: Connect & install crypto apps on your Ledger device.
- Exchanges: Discover some selected exchange services.
Application controls
The top bar contains the application controls.
- Network status: The current status of synchronization with the blockchain networks of the crypto assets you’ve added. Click on it to force synchronization.
- Settings: Access Ledger Live’s settings.
- Password lock: Lock your session instantly by clicking on the lock icon. You must have set the password first under settings for this to work.
Adding existing accounts

Click on the Plus Icon in order to add accounts of the cryptocurrencies that you have already installed on your ledger hardware device. They will then be added to your account list and your portfolio.
Choose the Crypto asset

- First Check on your Ledger device that you already have the specific crypto app installed.

In this example, you can see that I already have the Bitcoin and Ethereum app on my Ledger Nano S, so I can add my Bitcoin & Ethereum accounts. You cannot add an account without first having it installed on your Ledger device. (To install access Menu > Manager > Connect & Allow Ledger > App catalog > Install)

Official Instructions
- After clicking the PLUS icon to add accounts, on your left panel.
- Choose your Crypto asset from the drop-down list.
- Click Continue.
- Now connect and unlock your Ledger, open the app of the selected crypto asset by pressing the left & right buttons simultaneously on your Ledger Hardware wallet.
- Click Continue. Ledger Live will check in the blockchain if your Ledger device manages any existing accounts. These are then displayed.
- Under Add existing account section, make sure the account(s) to add are check-marked. Choose a name for the account(s) to add.
- Click Add account.

Information on your cryptocurrency holdings or assets will now be displayed on the left hand panel on your Ledger Live window.
You can now check on your Cryptocurrency investments at your own convenience at any time on your computer.

Ledger Live gives you Real-Time Combined Balances of all your crypto-assets in your native currency so that you can keep yourself abreast with the volatile fluctuations of the cryptocurrencies you’re interested in.
This is a great way for Hodlers or even short term investors to keep an eye on the value of their assets in any fiat currency. Of course if you’re a Bitcoin-Maximalist, all you care about is accumulating as many bitcoins as you can.
Under Accounts, you can also click on each individual cryptocurrency account to view independent charts of its fluctuations.
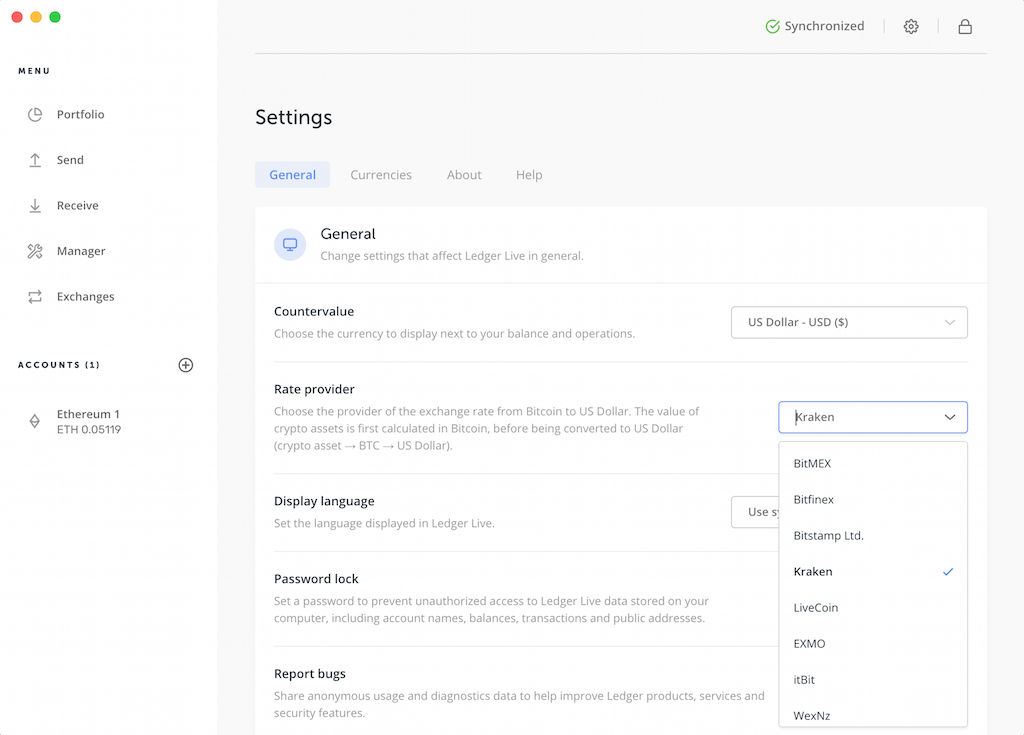
Change to your native fiat currency via Settings.

You can also change the Rate Provider, if you’re using a specific cryptocurrency exchange:
Receive Crypto via Ledger Live

How to receive cryptocurrencies on your Ledger Hardware wallet? Simple get your receive address right here on your Ledger Live.
Copy that address and paste it wherever you want for people to send you coins.
Official Instructions
- Click Receive on the left panel.
- Choose the cryptocurrency account from the drop-down list to receive.
- Click on Continue.
- Connect and unlock your device. Then open the crypto asset app as instructed.
- Read the on-screen instructions and click on Verify to generate a receive address on your device.

- Verify that the address shown on your screen is the same as the address shown in Ledger Live. If the addresses are the same, press the right button on your device to confirm.
- Click Copy to copy the address and share it with the sender of the transaction. Carefully check that the address does not change after you copy and paste it.

Don’t have your device?
One of the unique aspects I’ve found with Ledger Live is that you can receive your cryptocurrencies by generating a unique receive address in the Ledger Live application without needing to connect to your Ledger Hardware wallet device. You can’t do this with the Chrome extension.
Of course Ledger does mention that for optimal security, you should use your Ledger Hardware wallet device to verify the generated address before sharing it with the sender of the transaction.

Privacy of blockchain addresses
You can share your generated Ledger wallet address with your sender for any cryptocurrency account you have.
Blockchains are basically public networks. Anyone who has your wallet address can basically view how much Crypto you’ve received up till now. This isn’t dangerous per se, but for optimal privacy, you shouldn’t re-use the address after each transaction.
Ledger helps you maintain your privacy by generating new addresses for your Bitcoin wallet without needing you to crack your head
Your previous addresses for Bitcoin will remain valid, you can use it however or wherever you want to, but they don’t offer an optimal level of privacy. So each time you open up your Ledger Live to get a receive wallet address, know this; you will get a new wallet address but all the differing addresses are all still tied to your account in the private key of your Ledger Hardware wallet.
Send Crypto via Ledger Live
Use you Ledger Hardware wallet to connect to your Ledger Live in order to send your cryptocurrencies from your accounts to another person’s recipient address.
Official Instructions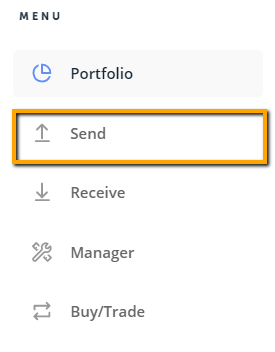
- Click Send on the left panel.
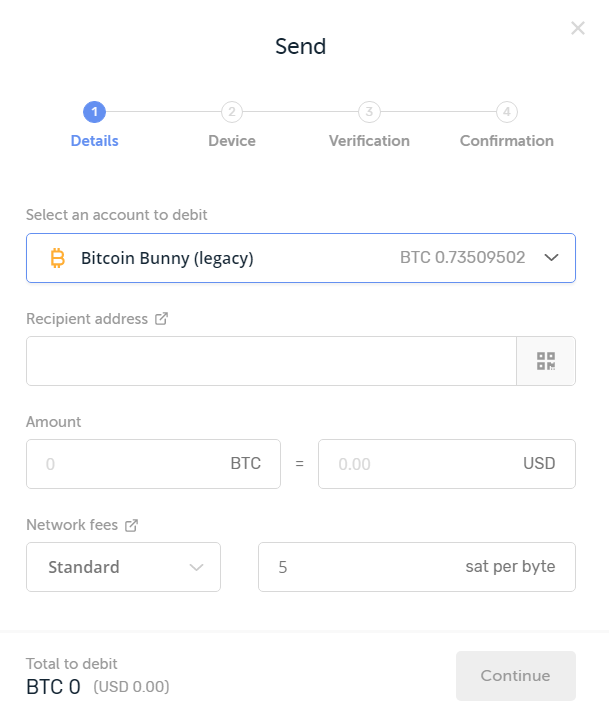
- From the drop-down list choose an account to debit.
- Enter the Recipient address. Always double-check addresses that you copy and paste.
- Enter the Amount of the crypto asset to send, or its countervalue*.
- Choose the Network fees from the drop-down list. A higher fee leads to a faster processing of the transaction.
- Click Continue.
Verifying your Transaction
- Connect and enter your PIN to unlock your Ledger wallet.
- Find and Open the crypto app that you’ve chosen.
- Click Continue.
- Carefully verify all transaction details on your device.
- Press the right button to confirm and sign the transaction if everything is correct. The transaction is then signed and sent to the network for confirmation.
- Click View operation details to track the transaction until it gets confirmed.
A Multicurrency Software Ledger customers have long been waiting for…
I hope you found this guide useful. The features available on the Ledger Live is intuitive yet powerful for everyday people to trade without trusting an intermediary to verify the transaction.
If you hit any stumbling blocks, please feel free to comment below and I will reply you shortly.
You can download the Ledger Live here. Get the Ledger Nano S or Ledger Blue to fully utilize Ledger Live’s features.
You can also contact Ledger’s Official Support and use their Live Chat.